How to Embed Yammer Conversations for SharePoint Online

Your company’s intranet allows employees across your organization to engage and share ideas using Yammer. But did you know that you can embed these conversations for your SharePoint online pages? This not only helps to foster engagement but also build a community among your employees. Here’s how you can embed your Yammer conversation to a SharePoint site.

6 steps to embedding a Yammer conversation

1. First, go to Yammer and open the conversation you want to add. Copy its group URL. You can use any browser to view the conversation. The browser will show recent and past conversations, along with popular or highlighted conversations.

2. Now, go to your SharePoint online page. You will find an option to Edit the page on the top right corner. Click on Edit to continue.

3. You will see a small “+” sign. Hover your mouse on this icon. It will give you two options: add a new group or add a group to an existing conversation. If you already see Yammer in the dropdown option, you don’t need to start a new group altogether. On the other hand, if you don’t see Yammer, you should add another conversation to embed the URL you just copied. Click on the “+” sign and select your Yammer web part.

4. You will get an option to Add a Group. Click on that.

5. A message box will appear asking you to paste the URL of your Yammer group. Paste the URL in the box. Also, make sure you check the box that says “Latest Conversations.” If you want to embed one of the popular conversations, you should check the box that indicates “Top Conversations.”

This part is crucial as it determines the conversation that SharePoint online will share once you embed the Yammer group URL. Top conversations or highlighted conversations only show your group’s most engaging conversations, while the latest conversations keep you updated on the group conversations that took place recently.

6. Lastly, you must save and publish that page. It takes a few seconds for SharePoint online to update its library and post the Yammer conversation.

Once you publish the conversation, anyone can create a new post on SharePoint online by clicking on the dialogue box that says “Post a message.” Alternatively, you can click on one of the posts on SharePoint online and it will redirect you to the Yammer page. You can read the entire conversation on Yammer. There is also a View More option on SharePoint online where you can view past messages. This opens up all the previous posts in your Yammer group.

But in order to utilize this facility, you need to check the box that says Top Conversations. You will be able to view all the highlighted conversations on Yammer directly from your SharePoint online page.

If you are not one of those who like to go through all the group conversations one by one on Yammer, you can embed the top conversations on SharePoint online. This way, you can keep track of both the latest conversations and the hot topics of a discussion without asking anyone in your group.

If you need guidance on SharePoint, we recommend contacting a consulting service.

How To Sync Microsoft SharePoint And Teams Files With The OneDrive Sync App

If you use a standard PC with Microsoft installed, you are likely aware of something called OneDrive. This is a cloud-based platform where you are able to store your information on the cloud. Everything can be directly stored on the cloud or you can also, for quicker access, have a separate copy of this in a folder on your computer. The primary premise of using this is to share your information with other people. If you have a business, this would be referred to as Teams. Your team members will also have access to this same cloud-based system and sharing files between all of you will be possible as long as you have that Microsoft OneDrive sync application. This is how you can connect everyone together.

What You Should Know About OneDrive

This is a system very similar to other cloud-based applications that you can pay for on the web. It is included for free with all Microsoft installations. Of course, you do need to have a Microsoft account set up so that you can log in. Once you are, there will be an icon down below on your taskbar that you can click to access and store information. It is part of the Microsoft 365 apps, and this will connect with far more than just your files. You can also use what is called SharePoint which is an innovative solution by Microsoft to connect team members that may be working for the same company.

An Overview Of Microsoft SharePoint

SharePoint is also a cloud-based service. It is designed for organizations that have multiple team members that want to share applications, knowledge, and also manage that content. Teams can work from remote locations, yet because all of the information is available on the cloud, they can seamlessly collaborate together to work on any type of project. There is a large difference between OneDrive and SharePoint. OneDrive is typically designed for personal use. However, you could provide your login information to others, or you could access your OneDrive from another person’s computer. SharePoint includes the ability to do a collaboration. It is meant for this purpose. It also has other options including CMS and the use of what are called dashboards. Therefore, once you have purchased SharePoint, and your team members also have access, collaborating will never be easier.

How To Connect SharePoint With OneDrive

This is possible using the Microsoft 365 app launcher. If you have a subscription to this service, it is constantly uploading and updating all Microsoft related programs. You will want to click on the launcher, selected teams, or SharePoint itself, and then choose all of the files that you want to share on this cloud-based system. You will simply navigate to the folder or subfolder that you want to sync. Once you have selected sync, you will be asked to give permissions. Doing so will connect your OneDrive with SharePoint, and those that are connected to SharePoint will now have access to this information.

Potential Problems And Solutions

One problem that you may encounter is that you may receive an error such as a locked icon in reference to a file. It may tell you that it is only designed for read-only access. This means that you will not have access to it because the file permissions have not been augmented properly. In that case, you will have to contact your admin to have them make it more than read-only. This can also happen within OneNote notebooks. Other than that, this process will be flawless and allow your team members to share files easily.

If you’ve never used OneDrive or SharePoint before, there are consultants that can help you with you do run into complications. It is designed to run automatically, but you do need to have an account with Microsoft, as do the others that will participate in the sharing. In the same way, those that are connecting to SharePoint should also have OneDrive activated. This is how they will be able to not only access this information but downloaded to their computer. Through this process, businesses have crossed the world are able to share information and data fluidly using these state-of-the-art filesharing applications.

SharePoint PowerApps

How to Access a PowerApps Custom Form in SharePoint without a License?

PowerApps is a licensed product under the Office 365 framework and it offers three licenses: PowerApps for Dynamics 365, PowerApps for Office 365, and PowerApps Plan 1 and 2. You don’t need to buy the license right away. PowerApps in SharePoint allows a 90-day trial where you can experiment with custom forms without requiring a license. However, you will need to log in using your company’s credentials. PowerApps has a strict policy on user logins. It immediately blocks any user that is not a registered company.

Accessing PowerApps Custom Form in SharePoint

You can access a custom form for a SharePoint list by opening PowerApps on your browser. Here, you don’t need to enter traditional C# or .NET codes. As soon as you publish the changes, the form gets embedded on the SharePoint list automatically. This means all your team members will be able to see the changes whenever they open the form. PowerApps also allows you to create conditional formatting, review analytics reports, and connect the form to other data sources.

Customizing the form

Sometimes you may not find the Customize Form option or the form may not work properly for your SharePoint list. It means that the list contains unknown data types that PowerApps don’t support.

Access your PowerApps custom form from your browser. First, you need to create a list. Make sure you include columns, such as availability, color choices, prices in respective currencies, and details of your site. Once you complete this step, follow the instructions below:

1. Opening the form

• Select PowerApps from the command bar and click on Customize Form. Your PowerApps Studio will open on the same browser.

• A Welcome to Power Apps Studio message will appear. You may choose to see the message or skip it.

2. Moving and removing a field

• The fields on the form appear according to the order you want. You may drag any column up or down, depending on its priority.

• To remove a field, you need to click on the ellipsis icon beside the field. Select Remove to delete that field permanently.

3. Setting conditional formatting

• It is possible to customize the availability, colors, and price fields by selecting their details to Yes.

• Go to the left navigation bar to expand the Details of DataCard1. Note the numeral appearing at the end of the DataCardValue.

• Now set the Visible properties of the above fields by replacing the numerals one by one.

• You can later review the changes by selecting the Details tab while pressing the Alt key.

4. Saving and publishing the custom form

• Go to File, then click on Save.

• Double-click on Publish to SharePoint.

• You can go back to editing the form by clicking the back arrow on the top-left corner.

You can make the most of the 90-day trial period to understand how custom forms work in SharePoint using PowerApps. If you feel comfortable, you can buy one of the three types of licenses mentioned above or hire a Microsoft PowerApps developer.

Understanding the Differences between Sharepoint Community Site and Hub Site

Ever since hub sites released, the SharePoint community divided into two. One that supported the conventional community site, while the other supported hub sites. But, here’s the deal. Just because Microsoft launched a new function doesn’t necessarily mean the existing process is bad.

Why is there an argument?

There is a dilemma among users that created the whole divide. It revolves around the simple fact that whether users should create entirely separate site collections or different subsites for different departments and projects. Separate site collections provide more control to the user. However, there is a drawback in this system.

Whenever the user creates new site collections, it provides entirely new characteristics, such as security, navigation, metadata, and branding. So, if the user has already set their navigation and security in one of the previous collections, he/she needs to repeat the same process manually all over again. This is not a practical way to work, especially when there are lots of pending projects that users need to complete. That is why users don’t usually use community sites unless they have to.

Importance of hub sites

Hub sites have come up with a unique way to solve the above problem. The objective here is not to confuse users with tons of community sites. Accounting analysts have to deal with a lot of reports every day. If they keep using community sites, they will spend most of the time changing the details of the collections. So, instead of creating these hierarchies of community sites, hub sites allow the users to create separate site collections and organize them into different hubs.

This function provides a flattened structure. Users start with a community collection and end in a hub. That means, everything they do inside the community site remains inside the hub. They can later copy or edit that hub according to the accounting reports. Users could create collections before also, but they couldn’t bring these collections together into one group. This made them change the settings of every site manually over and over again.

Hub sites are particularly helpful when there is a department restructuring or company reorganization in a specific year. The user won’t have to move sites or rebuild their navigation from scratch. All they have to do is change the existing hub and make the necessary edits.

The issue with community sites

The most significant reason why people don’t prefer using community sites is it allows them to create different levels. They are similar to complicated folder hierarchies where users could create two or three subsites. But, community sites don’t have that restriction. Users can go on to create fifty or hundreds of sites, and every time they do, they will have to change the settings manually. That’s one good way to kill time!

So, when it comes to community site and hub site, the latter wins the race by a fair distance. Users want simplified functions, and hub sites offer that facility. Moreover, it saves a lot of time that allows users to focus on other work.

Using Complex FIeld Types in SharePoint

Complex field types are useful for communicating between different systems and allowing, for example, data from an external application to be displayed with relative ease.

Complex field types are field types which contain other types. For example, a “Customer” field could contain, within it, the data for the “Customer ID” and “Customer Name”. The “Address” field could have “House Numer”, “Street”, “State”, “Country” and “Postal Code”.

Complex field types are particularly useful because they make it easy to search and display the data.

Common Problems With Complex Fields

One problem with complex fields is that on paper it is possible for a complex field to contain another complex field. In practice, however, not all applications will support this gracefully and some may struggle to break down the inner complex field and display it correctly.

Other issues occur if there is formatting within a complex field. If there is formatting data stored in the field and your application cannot understand it, then this can create unexpected issues. Fortunately, most of the problems are cosmetic, but they still need to be dealt with.

Service Layers in SharePoint

The most effective solution is to use a service layer in SharePoint to manage the formatting and to handle the processing of the complex field. This is the best way to ensure that your complex fields are handled in exactly the right way, however it is not without issues when it comes to maintenance and overheads since it means that you will need to maintain service-level code. In some cases, using the presentation layer to manage complex fields may be simpler. It depends on the way the SharePoint application is already set up, and what code already exists.

SharePoint has options for encapsulating the complex field’s handling in its own class. This allows you to flatten the external content so that you can then handle it in SharePoint using the Business Data Connectivity Designer.

When Complex Fields Make Sense

Complex fields make sense if you are trying to integrate your SharePoint application with external data. If you are operating the other way around and are gathering the data in SharePoint then there are options that may well be more effective. For example, you can use Custom Field Types, which are built in to SharePoint, to ensure that your data is handled in an efficient, robust and error-free manner. Custom Fields can be collected using forms, and you can control the way they are sorted (for example sorting an address by “City”) quite easily using features that are already built in to SharePoint.

SharePoint forms make it easy to collect and validate data, too, so from the end user point of view your application will be robust and stable, and there is less code that can go wrong compared to if you are trying to process data that belongs to a complex field.

The option to handle complex fields exists, but it is one that should be employed only when it is absolutely necessary to do so.

Developing Azure Functions For SharePoint

If you’re unsure of what Azure Functions are, don’t worry because we’ve got you covered. Simply put, Azure Functions are used for the sake of running small bits of code and even functions for cloud-based storage. It also allows users to write code for any particular problem without the need for worrying about the infrastructure to properly run a piece of code. Read on as we dive further into developing Azure functions for SharePoint.

When programmers are able to make use of continued development, it increases their productivity. And it even allows them to use their choice of development language. Users are only charged for their run time and they can easily scale with Azure. Additionally, clients can also create a series of applications which run without a server.

Azure also gives its users the ability to perfectly process data, build simple APIs, integrate systems and even conduct work with the Internet-of-Things. It even allows them the option of scheduling processes that run with specialized built-in functions. However, these functions can be created with the use of base templates that support various environments. The following are some of the templates provided:

  • GitHub Webhook – this readily responds to events on GitHub
  • Blob Trigger – processes Azure blobs for storage
  • EventHub Trigger – readily and quickly responds to Azure’s Event Hub
  • Generic Webhook – deals with requests from Webhook HTTP
  • Queue Trigger – allows a response to Azure’s Storage Queue

How Do You Use An Azure Function With SharePoint?
Functions created in Azure aren’t directly connected to SharePoint. Simply put it is seen as a completely different service within SharePoint. However, you can make use of hook requests and even provide HTTP callable URLs which go on to act as the initiator. This initiator then goes on to execute your written code; users can also convert their code into Azure Functions.

How To Create Azure Functions?

  • You’ll firstly need to create the Azure Function App which specially hosts Azure Functions. In order to do this, you’ll need to click the New tab and then look for the function app.
  • Then you’ll need to click create.
  • You’ll then be prompted to populate the relevant values required.

It should be noted that the above process takes quite a while in order to be completed. Once this step is finished, you’ll be automatically notified. If you proceed to click on the notification, it will begin to display the settings of your function.

In order to add a new function, you’ll need to follow the following step:
You’ll need to click the add button next to the Functions tab and you’ll be prompted to select from the listing.

Creating A Webhook Plus API

  • In order to create this particular function, you’ll need to select Webhook plus API as your option.
  • You’ll then need to select the language as CSharp.
  • Next you’ll be able to click create and you’ll be shown the sample code.

As we conclude we have just looked at developing Azure functions for SharePoint. We have discussed what is Azure Functions. And we have also gone into a brief illustration on how to create a function. It should be noted that there are other functions which can be created as well!

SharePoint Features You Should be Using, But Probably Aren’t

It doesn’t matter if you’ve been using SharePoint for a few weeks or a few years, chances are you’re not familiar with all of its features. Maybe you know about some features, but you’re not using them. With that said, here are a few SharePoint features you should be using, but probably aren’t.

WorkFlows

If you aren’t using WorkFlows you should. A workflow is a group of tasks, as well as decision points that can lead to several outcomes or just one. Workflows are a lot like flow-charts, and there are many templates to choose from within SharePoint. Adding a workflow is easy, but there are four roles associated with it.

The roles are creator, author, initiator and participant. If you want to manage and complete tasks with ease and stay on top of everything, then start adding workflows today.

 SharePoint Lists

SharePoint lists are another feature that everyone isn’t taking advantage of. There are two main ways to manage information with SharePoint, with one being a library and the other being lists. Lists are similar to spreadsheets because columns and rows make them up. However, these lists are within SharePoint and not in Excel and many people have access to it at the same time.

Allowing multiple people to access SharePoint lists saves time because you don’t have to email them individually to people. Also, you don’t have to keep track of changes being made from users. You will love using SharePoint lists much more than spreadsheets.

Also, creating lists and reviewing them is easy. The same goes for updating and deleting them. All you have to do is click on the Add Lists section of SharePoint.

Libraries

Libraries are useful because you can use them for various tasks. You can use them to filter out data, store data and modify it. You can even group data and you can capture meta data.

Team members can use libraries to work together to create files, update those files when needed and collect files. SharePoint provides you with a number of default library apps you can use, so check them out and become familiar with them. The chances are that libraries will become one of your most favorite features.

Creating a library is simple. Go to the SharePoint Class site. Once there, go to the pane that mentions libraries. Click on the link and you’ll be well on your way to creating a library.

Search

SharePoint has a search feature that you’re probably not using. This basic feature lets you find queries that are placed against the data stored in the server farm. In short, this helps you find a lot of relevant information with ease.

Search results can contain a lot of info, such as links to your list items and libraries that you’ve created. It can even point you to links to sites and individual web-pages, as well as documents. The search engine that SharePoint uses takes many things into account, such as your previous searches and permissions, which play a role in what results they will return to you.

Project Site

Use the Project Site template to help with managing work. You can use this to help with task lists, calendars and creating a document library. This is a basic SharePoint feature, but a lot of people don’t add project sites to SharePoint and they should because it is incredibly useful.

Are you using any of the above features? If not, then you should start as soon as possible. Trust us when we say you don’t know what you’re missing. Go ahead and start using them today and the chances are you won’t stop using them.

What is a SharePoint Hub Site and Why Should You Use One?

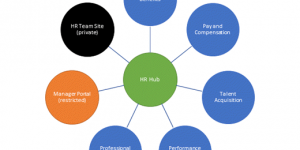
Hub sites in SharePoint exist to allow organizations to connect multiple sites and organize them into categories based on various criteria. That could be division, department, project, region, or many other factors.

SharePoint Hub Sites:

– Improve the discover-ability of content

– Allow companies to apply consistent branding and structure, as well as navigation, across several sites

– Offer the ability to search across multiple, related sites

SharePoint administrators have the ability to dictate how many hub sites can exist, and to control who has the option of associating their sites with a given hub. If a site creator associates a site with a hub then the site will acquire a ‘hub site’ nav bar at the very top. It will also inherit the look of that site, and any applications or custom lists which are associated with it.

Who Can Manage Hub Sites?

Only SharePoint administrators can create hub sites. A Site collection administrator has the option of associating a SharePoint hub site with an existing hub site, but they cannot create a new hub. If an administrator clicks the ‘create site’ link that is located in the upper-right corner of an existing hub site, then that new site will automatically be associated with the hub.

Shared Navigation and Search

The main reasons that you should use SharePoint hub sites are the shared navigation option, and the cross-hub search. These two features ensure that people can find the content that they need. Hubs also help to create a cohesive brand across all sites and save time when it comes to searching too.  Users will see the content that is presented on the hub sites, without having to worry about going to each site individually. SharePoint will handle security and access rights automatically, so individual users will be shown only content that they are allowed to access.

Easy for Administrators

SharePoint hub sites are easy for administrators to develop. When an administrator creates a hub site, what they are really doing is converting their existing site into a hub. The hub site navigation bar will be placed at the top of the site, but the home page and the content of the site will be preserved.  If that’s all you do when you make a hub site, then you will still enjoy some benefits because of the network search and the ease of access to other sites in the network through the nav bar, but you are missing out on some useful features.

SharePoint offers Web Parts that are handy widgets which you can add to your site to add more features. One of the most useful web parts is the News web part. This will aggregate the news from the sites that are a part of the hub and show it on the home page. You can select which sites will be included in the web part, so that the news remains as relevant as possible and so that very active sites don’t drown out the other sites on the hub. Again, SharePoint will not show a user News if it is from a property that they don’t have the rights to view.

Other useful Web Parts include Events and Highlighted Content. These are good ways of showing off the most important content that is being created on the sites in the network.

Planning a Hub

If you’re new to online collaboration and communities, then deciding how to organize your network of content may be tricky. Hub sites are very useful, but you need to have an overarching idea of what you want on the intranet. Think of the hub sites as the connective tissue that will hold the separate team sites together. Ideally, anything that is going to be the focus of a lot of effort and communication deserves its own hub site. So, if you are a software development company and you have three separate projects, each project would have its own site collection. A hub site brings together several other sites.

You might want to have separate sites for your art team, UX team, backend team, etc.

Prior to hub sites, subsites were used to provide the ‘connections’ for the rest of the intranet. Subsites are inflexible, though, and relying on them makes it hard to make changes in the future. Should you need to restructure, you will have to change a lot of links and a lot of content. Subsites are harder to control in terms of security policies too. A hub site can be updated, changed, managed and reclassified much more easily, and is therefore comparatively future-proof.

If you think about how often staff members change teams, projects get started or abandoned, and working relationships change, it makes sense to use hub sites instead because they cover all of those awkward management challenges for you, providing a smoother experience for your team members.

4 Ways To Customize Your SharePoint Forms Using PowerApps

If you have always wanted to build a custom app for your business, there are many companies that can do this for you. You can simply submit your order, provide them with the description of what you would like to create, and they can produce this for you. However, if you want more control over how it is created, or if you simply want to save money by building one on your own, you could use what is called Microsoft PowerApps. You can do many things with this platform, including customizing your SharePoint forms which can save you a lot of time. Here are five ways that you can customize SharePoint forms using PowerApps.

What Is SharePoint?

Most people know what SharePoint is, a collaborative platform that is completely web-based. In interacts directly with Microsoft Office, and has been available to the public and businesses since the turn of the millennium. SharePoint comes in two different styles including the standard version and what is called Enterprise. These are going to resign on your server, and you also have 1/3 choice which is called SharePoint Online. The applications that are available will include content and document management systems, social networking and intranet capabilities as well. There is a collaborative software aspect and a file hosting service. However, many people use this because of the custom web applications that you can develop.

What Is PowerApps?

Microsoft PowerApps represents a service that allows you to design and build custom business applications. You will be able to connect to the web, sharing data, plus you can work with these with your mobile phone or from your computer on the web. This is a top choice for many smaller businesses and individuals because custom software development can be extremely expensive. You would be very lucky to find a programmer that would charge you less than $1000 just to get started. That’s why learning how to use this platform from Microsoft might be of interest to anyone trying to save money.

How You Can Use PowerApps To Modify SharePoint Forms

SharePoint forms will look very similar to forms you have used on the web many times. There are going to be multiple fields where you can request that people enter in specific information. This could include their name, phone number, address, and any other pertinent information. This information can then be saved on your system so that you will have information about your clients that are signing up for a service that you are offering. A Microsoft Power Apps developer can be used to create a specific app that will allow you to modify or execute the forms that you are providing for customers that you want on your database. When you program the app, you can have people download this. When they open up the app, they will then be presented with a form. This allows you to avoid the necessity of adding these forms to a website. The app will automatically connect with the software on your server, adding the information that they are providing.

How to Customize Your SharePoint Forms with PowerApps

First of all, you can customize your SharePoint form using one of these apps by modifying the different fields that are available. For example, if you have one standard form that people are using to enter in their information, if your app is on your phone or tablet computer, you can easily modify the form that is directly connected to your PowerApp.

Second, if you are working with a team of people, you can give them access directly to the app as an administrator. This will allow you to delegate changes that can be made to the forms using team members, wherever they happen to be.

Third, the app can be multifaceted. This means that it can connect with different forms for different businesses. You simply need to provide them with choices as to which form they will choose and then they can enter in their information.

Fourth, your application can be used to access all of the information on your server. For example, if you have hundreds or thousands of people that have entered in their information, you can create a search function so that you can find their information promptly.

These are just a few ways that a PowerApp can be used to modify SharePoint forms. You can program the application to make additional changes, or different forms, wherever you happen to be. When Microsoft made it possible to connect both SharePoint and PowerApps together, their objective was to make it easier for people to create, modify, and access forms from remote locations. By learning how to use Microsoft PowerApps, and SharePoint concurrently, you can easily create a unique app that can provide you with these unique ways of modifying the forms from a PC, smart phone, or tablet computer.

5 Reasons to Upgrade to SharePoint 2019


If you are running a business, it is important that you keep all of your software up to date, With that said, the task of upgrading can be daunting and time consuming. This causes some organizations to delay upgrading until the last minute. Here are 5 reasons to move from your current version of SharePoint to SharePoint 2019.

Improved Support

It can be really complicated to move lots of business data onto the cloud without incident. Microsoft has improved this functionality in the latest version of SharePoint. The 2019 version is better because there is a huge focus on automation and it utilizes new technologies to make sure that everything runs more smoothly.

Lists

This is one of the newer features that in included with the new version of SharePoint. It creates an easier path for businesses to share, collaborate and gain access to all of the data they need. Since people will now have the ability to make lists and group information accordingly, it will be simpler to understand and have people work together rather than people becoming confused about order, how information should be used, access issues or some other problems.

The New Search Experience

It is now easier to search for the things you need when using SharePoint. Instead of a basic search, you are now able to see results before you even begin to type anything. In addition, once you start to spell out the term you are looking for, the results begin to update automatically. These searches are even grouped by type, so it should be much easier for all of the people who use this feature to find exactly what it is they are looking for.

Your Competition

Face it. When you are in business, it is important for you to stay ahead of the curve and be one or more steps ahead of the competition. There is no way for you to do that if you are still using software that was created more than 5 years ago, especially if everyone around is using the newer version. Do not allow your hesitancy to upgrade and stay with what is familiar to you to cause you to miss out on all of the benefits this new SharePoint can offer your business. Upgrading means that you will be ready to provide best in class service and applications using the latest technology..

Retired Features

One thing that everyone should look forward to with SharePoint 2019 is the fact that some of the features that were not very useful have been shelved. This means it is more user-friendly and has left room for them to add additional features that people may actually find useful. For instance, the aggregate news-feed has become read-only. This is a feature that many people have complained about, so it is nice that Microsoft has taken notice and made it go away. Surely, there are some who liked it, but for the majority it was a headache.

If you have not given serious thought to upgrading to the new version of this program, then why not? Don’t get left behind.Instead of continuing to use something that is just okay, why not attempt to use something that is totally dynamic? Your business may be doing well right now, but imagine how much better you could be doing if you decided to make the switch.